Mx-Space+Shiroi 部署+本地编辑器环境
Blog 前后端部署
后端 Mx-Space 前端主题为Shiro
后端 Mx-Space 部署
官方部署文档->推荐使用Docker部署 Docker 部署 | Mix Space (mx-space.js.org)
cd && mkdir -p mx-space/core && cd $_

# 拉取 docker-compose.yml 文件
wget https://fastly.jsdelivr.net/gh/mx-space/core@master/docker-compose.yml
然后配置这些内容修改docker-compose.yml文件
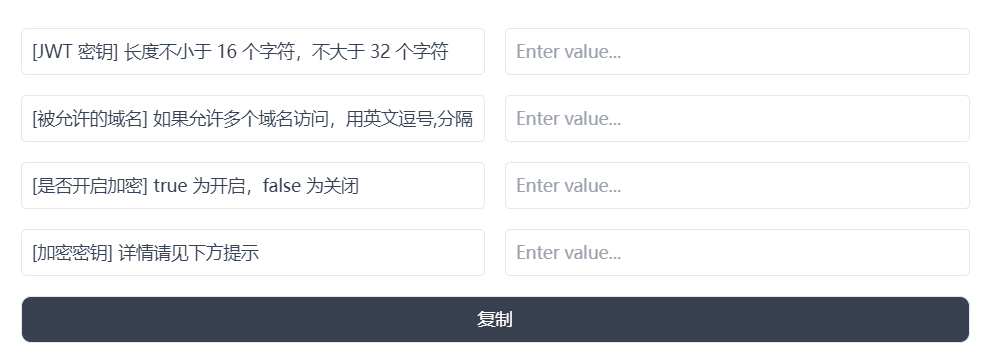
image.png
示例内容
- JWT_SECRET=testtesttesttest
- ALLOWED_ORIGINS=mxapi.test.cpm
- ENCRYPT_ENABLE=false
- ENCRYPT_KEY=
然后使用 docker-compose up -d 启动容器
后端反向代理部署
需要先安装宝塔面板,然后创建一个反向代理先
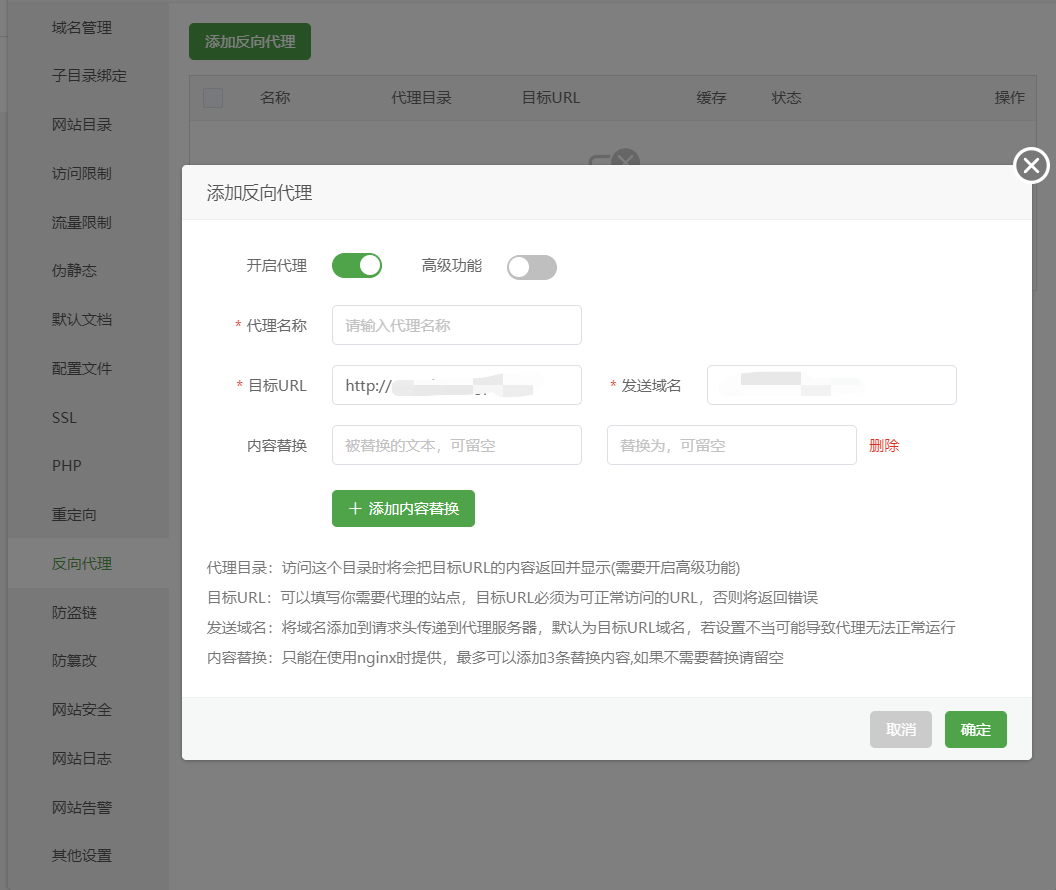
image.png
确认添加后访问 /www/server/panel/vhost/nginx
在文件路径中找到你的配置域名的conf文件编辑
复制下面的配置文件然后根据自己的需要将api.test.domain全部替换你自己的域名
server
{
    listen 80;
    listen 443 ssl http2;
    server_name api.test.domain;
    index index.php index.html index.htm default.php default.htm default.html;
    root /www/wwwroot/api.test.domain;


    #SSL-START SSL相关配置,请勿删除或修改下一行带注释的404规则
    #error_page 404/404.html;
    #HTTP_TO_HTTPS_START
    if ($server_port !~ 443){
        rewrite ^(/.*)$ https://$host$1 permanent;
    }
    #HTTP_TO_HTTPS_END
    ssl_certificate    /www/server/panel/vhost/cert/api.test.domain/fullchain.pem;
    ssl_certificate_key    /www/server/panel/vhost/cert/api.test.domain/privkey.pem;
    ssl_protocols TLSv1.1 TLSv1.2 TLSv1.3;
    ssl_ciphers EECDH+CHACHA20:EECDH+CHACHA20-draft:EECDH+AES128:RSA+AES128:EECDH+AES256:RSA+AES256:EECDH+3DES:RSA+3DES:!MD5;
    ssl_prefer_server_ciphers on;
    ssl_session_cache shared:SSL:10m;
    ssl_session_timeout 10m;
    add_header Strict-Transport-Security "max-age=31536000";
    error_page 497  https://$host$request_uri;


    #SSL-END

    #ERROR-PAGE-START  错误页配置,可以注释、删除或修改
    #error_page 404 /404.html;
    #error_page 502 /502.html;
    #ERROR-PAGE-END

    #PHP-INFO-START  PHP引用配置,可以注释或修改
    #清理缓存规则


    location ~ /purge(/.*) {
        proxy_cache_purge cache_one $host$1$is_args$args;
        #access_log  /www/wwwlogs/api.arthals.ink_purge_cache.log;
    }

    #提升申请SSL证书所需目录的匹配规则到反向代理前,可以保证自动续签SSL证书正常运行
    #一键申请SSL证书验证目录相关设置
    location ~ \.well-known{
        root /www/wwwroot/api.test.domain;
        allow all;
    }

    #禁止在证书验证目录放入敏感文件
    if ( $uri ~ "^/\.well-known/.*\.(php|jsp|py|js|css|lua|ts|go|zip|tar\.gz|rar|7z|sql|bak)$" ) {
        return 403;
    }

    #以下为核心配置项,设置反向代理,并设置 Upgrade / Connection 头以启用 WebSocket 链接
    location ~ / {
         proxy_pass http://127.0.0.1:2333;
         proxy_read_timeout 300s;
         proxy_send_timeout 300s;
         #proxy_set_header Host $host;
         proxy_set_header X-Real-IP $remote_addr;
         proxy_set_header X-Forwarded-For $proxy_add_x_forwarded_for;
         proxy_http_version 1.1;
         proxy_set_header Upgrade $http_upgrade;
         proxy_set_header Connection $connection_upgrade;
    }
    #禁止访问的文件或目录
    location ~ ^/(\.user.ini|\.htaccess|\.git|\.svn|\.project|LICENSE|README.md)
    {
        return 404;
    }

    access_log  /www/wwwlogs/api.test.domain.log;
    error_log  /www/wwwlogs/api.test.domain.error.log;
}
server_name定义的是请求的域名
http://mxapi.chengpi.wiki/proxy/qaqdmin 为后台访问地址
配置前端信息
根据自己的需求修改
{
    "footer": {
        "otherInfo": {
            "date": "2020-{{now}}",
            "icp": {
                "text": "萌 ICP 备 20236136 号",
                "link": "[https://icp.gov.moe/?keyword=20236136](https://icp.gov.moe/?keyword=20236136)"
            }
        },
        "linkSections": [
            {
                "name": "关于",
                "links": [
                    {
                        "name": "关于本站",
                        "href": "/about-site"
                    },
                    {
                        "name": "关于我",
                        "href": "/about"
                    },
                    {
                        "name": "关于此项目",
                        "href": "[https://github.com/innei/Shiro](https://github.com/innei/Shiro)",
                        "external": true
                    }
                ]
            },
            {
                "name": "更多",
                "links": [
                    {
                        "name": "时间线",
                        "href": "/timeline"
                    },
                    {
                        "name": "友链",
                        "href": "/friends"
                    },
                    {
                        "name": "监控",
                        "href": "[https://status.innei.in/status/main](https://status.innei.in/status/main)",
                        "external": true
                    }
                ]
            },
            {
                "name": "联系",
                "links": [
                    {
                        "name": "写留言",
                        "href": "/message"
                    },
                    {
                        "name": "发邮件",
                        "href": "mailto:[email protected]",
                        "external": true
                    },
                    {
                        "name": "GitHub",
                        "href": "[https://github.com/innei](https://github.com/innei)",
                        "external": true
                    }
                ]
            }
        ]
    },
    "config": {
        "color": {
            "light": [
                "#33A6B8",
                "#FF6666",
                "#26A69A",
                "#fb7287",
                "#69a6cc",
                "#F11A7B",
                "#78C1F3",
                "#FF6666",
                "#7ACDF6"
            ],
            "dark": [
                "#F596AA",
                "#A0A7D4",
                "#ff7b7b",
                "#99D8CF",
                "#838BC6",
                "#FFE5AD",
                "#9BE8D8",
                "#A1CCD1",
                "#EAAEBA"
            ]
        },
        "bg": [
            "[https://github.com/Innei/static/blob/master/images/F0q8mwwaIAEtird.jpeg?raw=true](https://github.com/Innei/static/blob/master/images/F0q8mwwaIAEtird.jpeg?raw=true)",
            "[https://github.com/Innei/static/blob/master/images/IMG_2111.jpeg.webp.jpg?raw=true](https://github.com/Innei/static/blob/master/images/IMG_2111.jpeg.webp.jpg?raw=true)"
        ],
        "custom": {
            "css": [

            ],
            "styles": [

            ],
            "js": [

            ],
            "scripts": [

            ]
        },
        "site": {
            "favicon": "/innei.svg",
            "faviconDark": "/innei-dark.svg"
        },
        "hero": {
            "title": {
                "template": [
                    {
                        "type": "h1",
                        "text": "Hi, I'm ",
                        "class": "font-light text-4xl"
                    },
                    {
                        "type": "h1",
                        "text": "Innei",
                        "class": "font-medium mx-2 text-4xl"
                    },
                    {
                        "type": "h1",
                        "text": "👋。",
                        "class": "font-light text-4xl"
                    },
                    {
                        "type": "br"
                    },
                    {
                        "type": "h1",
                        "text": "A NodeJS Full Stack ",
                        "class": "font-light text-4xl"
                    },
                    {
                        "type": "code",
                        "text": "<Developer />",
                        "class": "font-medium mx-2 text-3xl rounded p-1 bg-gray-200 dark:bg-gray-800/0 hover:dark:bg-gray-800/100 bg-opacity-0 hover:bg-opacity-100 transition-background duration-200"
                    },
                    {
                        "type": "span",
                        "class": "inline-block w-[1px] h-8 -bottom-2 relative bg-gray-800/80 dark:bg-gray-200/80 opacity-0 group-hover:opacity-100 transition-opacity duration-200 group-hover:animation-blink"
                    }
                ]
            },
            "description": "An independent developer coding with love."
        },
        "module": {
            "activity": {
                "enable": true,
                "endpoint": "/fn/ps/update"
            },
            "donate": {
                "enable": true,
                "link": "[https://afdian.net/@Innei](https://afdian.net/@Innei)",
                "qrcode": [
                    "[https://cdn.jsdelivr.net/gh/Innei/img-bed@master/20191211132347.png](https://cdn.jsdelivr.net/gh/Innei/img-bed@master/20191211132347.png)",
                    "[https://cdn.innei.ren/bed/2023/0424213144.png](https://cdn.innei.ren/bed/2023/0424213144.png)"
                ]
            },
            "bilibili": {
                "liveId": 1434499
            }
        }
    }
}
前端Shiro主题部署
apt install git nodejs npm
npm install -g pnpm pm2

# 进入源码目录编译
cd Shiro
pnpm i && pnpm build
然后修改你的.env文件,每个值都不能为空。token不用的可以为false
前端反向代理
跟后端的反向代理配置相同,修改2333端口改为2323端口即可
持久化运行
在前端代码目录中创建ecosystem.config.js
// ecosystem.config.js
module.exports = {
    apps: [
        {
            name: 'Shiro',
            script: 'npx next start -p 2323',
            instances: 1,
            autorestart: true,
            watch: false,
            max_memory_restart: '180M',
            env: {
                NODE_ENV: 'production',
            },
        },
    ],
};
然后就能够使用
pm2 start
pm2 list       #列出正在运行的pm2
pm2 restart 0  #0是你的listid
更新
后端
docker pull innei/mx-server:latest
[!warning] 现在的docker 由于墙的原因并不能直接拉取镜像 解决方法,本地能通外网的情况下,拉取镜像后导出镜像,在服务器上导入镜像
前端部署
使用CDN 加速Vercel
- 加速域名和回源host填写你自己的域名
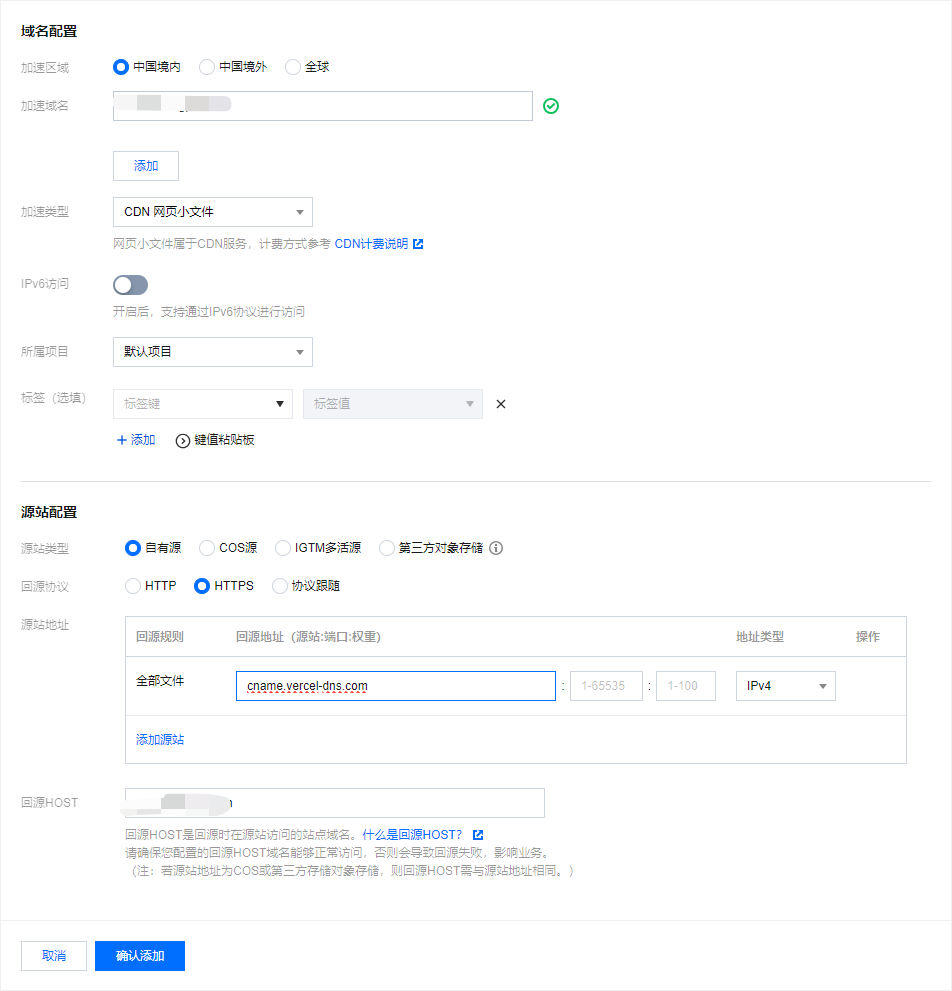
image.png
SSL 证书
通配符多域名证书
Picgo + Obsidian + OneDrive
Picgo 环境构建
- Picgo 下载地址 Releases · Molunerfinn/PicGo (github.com)
- Obsidian 官网 Obsidian - Sharpen your thinking
腾讯云环境
首先购买腾讯云对象存储资源包
然后创建存储桶 -> 安全性选择公有读私有写-> 后面的选项根据自己的需求勾选即可
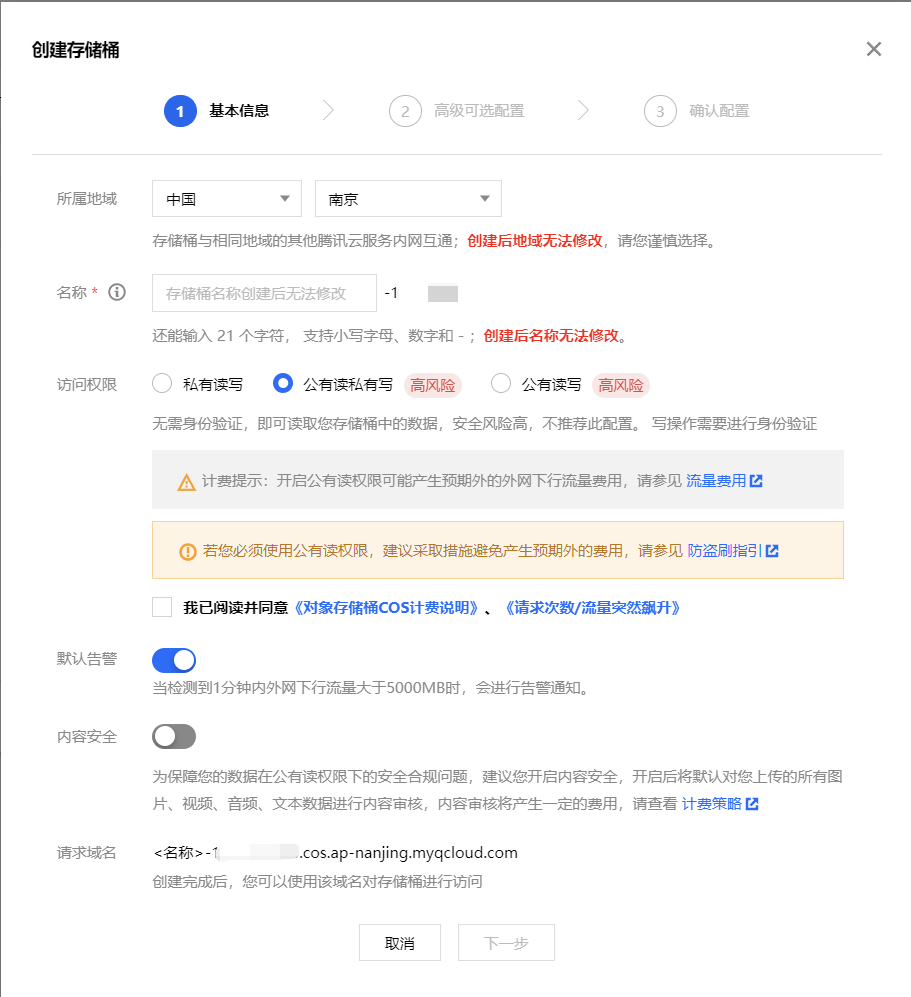
image.png
创建Accesskey
头像 -> 访问控制 -> API密钥管理 -> 新建密钥
记录下来填写进入Picgo的
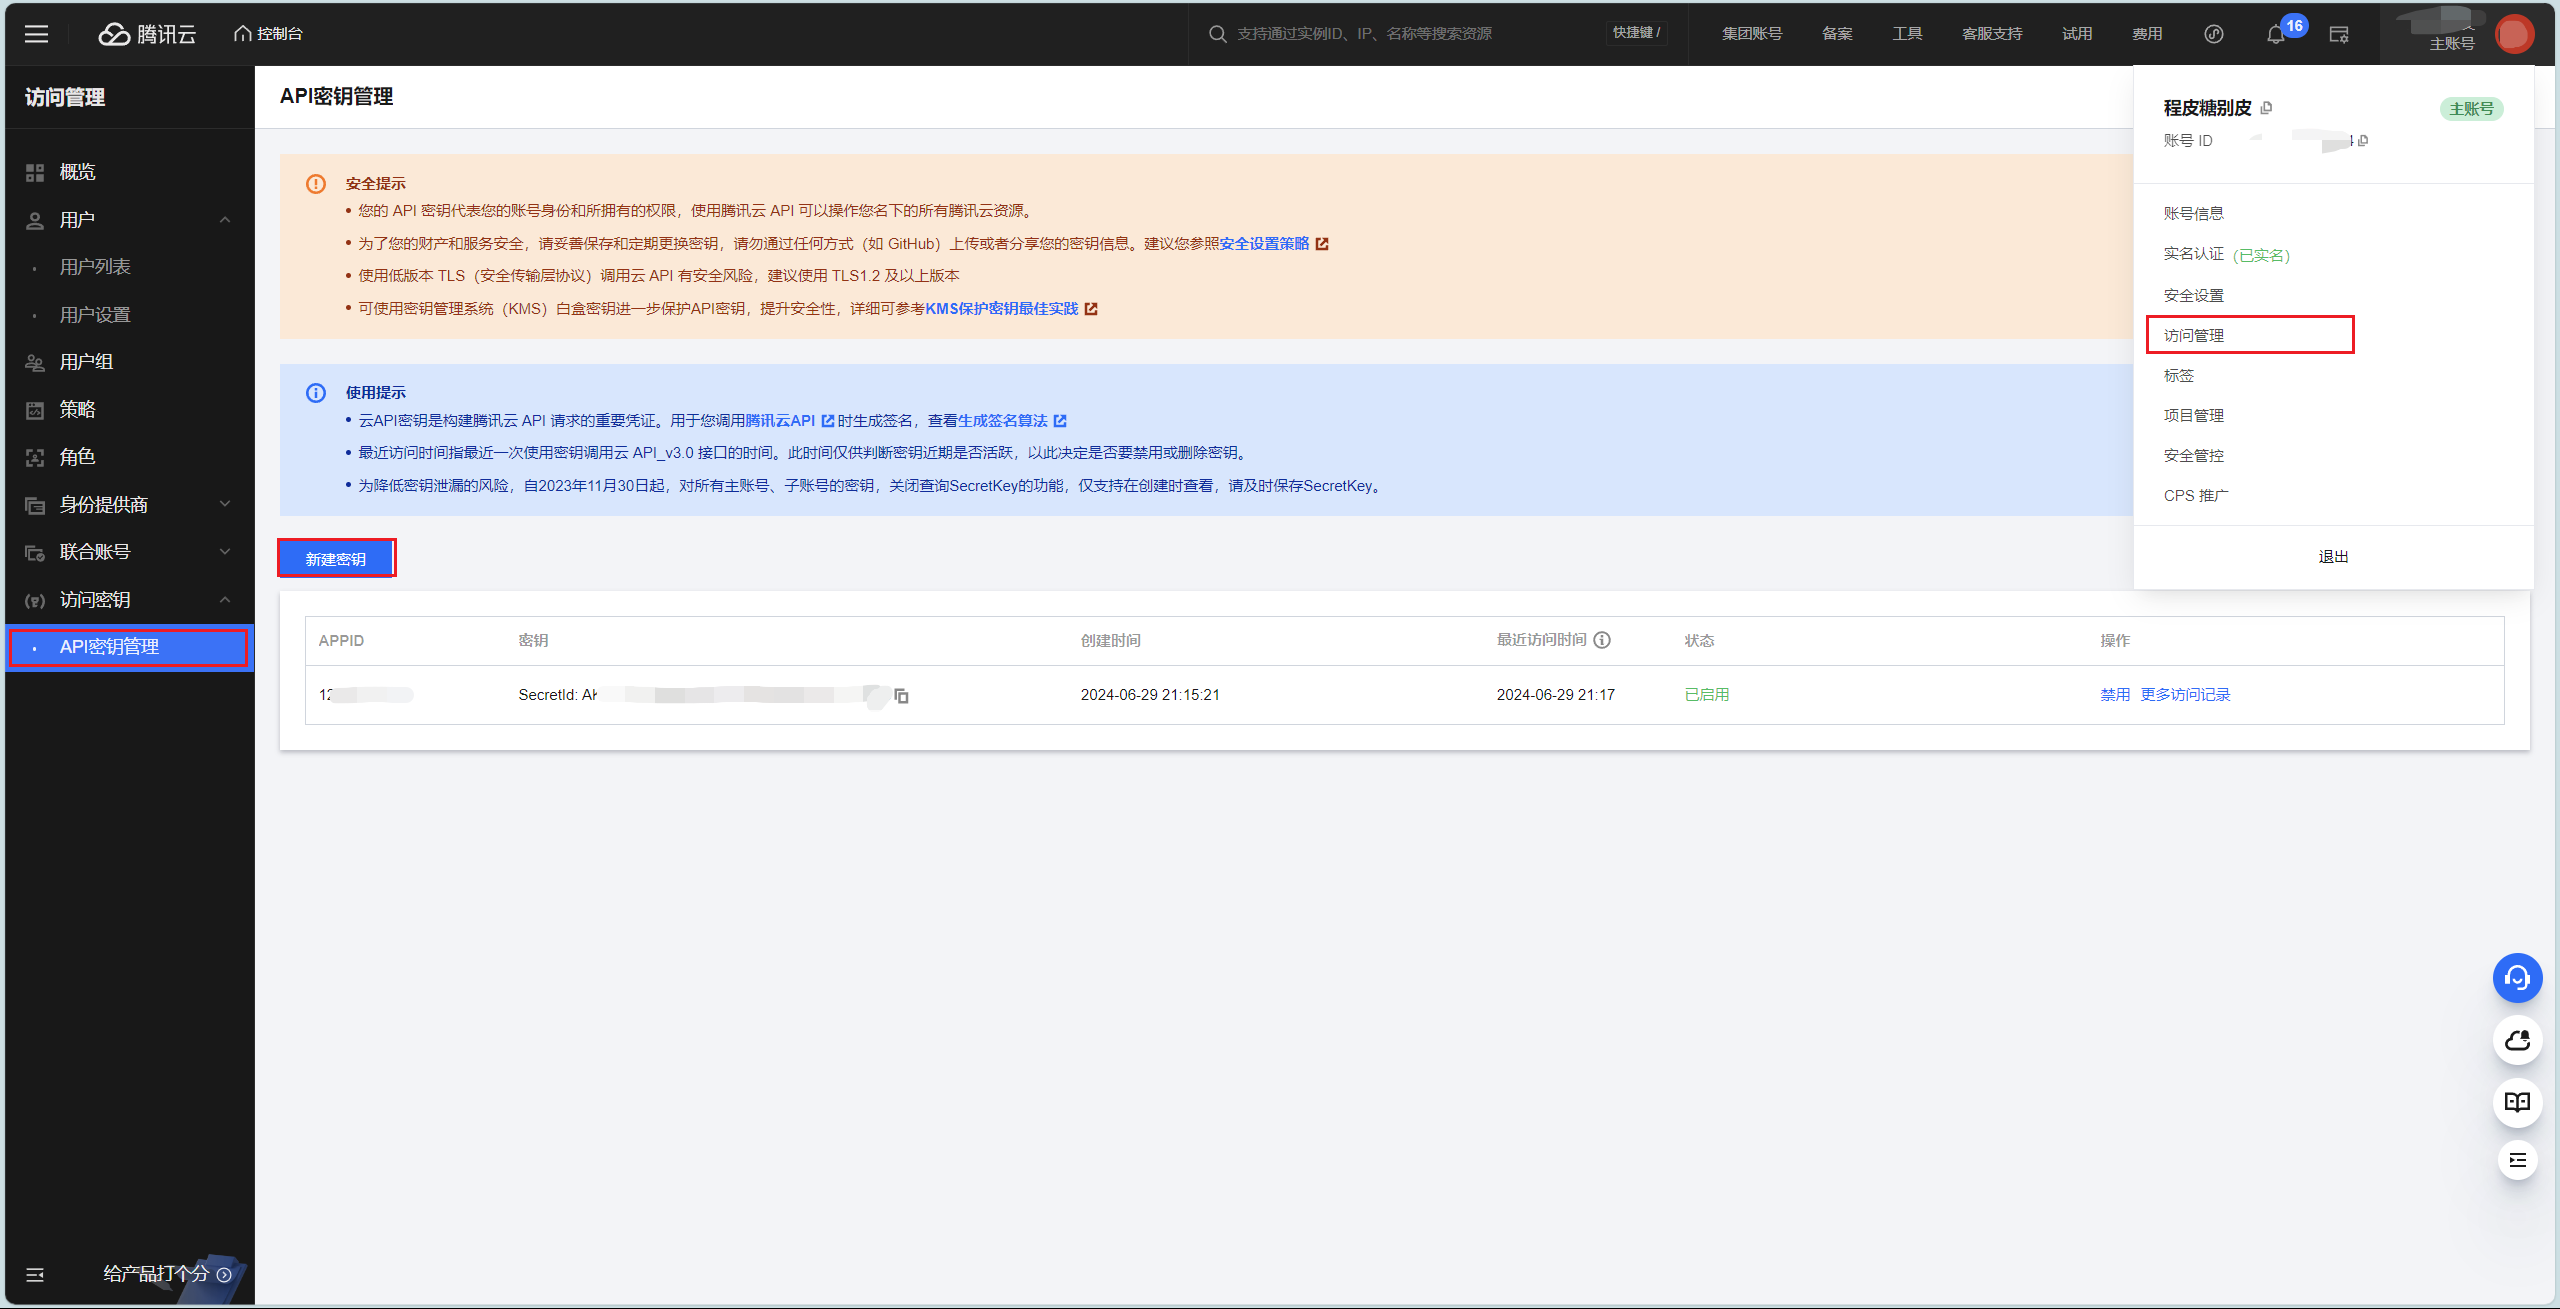
image.png
配置文件上传路径为YYYY/MM/DD/
在Picgo 插件设置中搜索 super-prefix
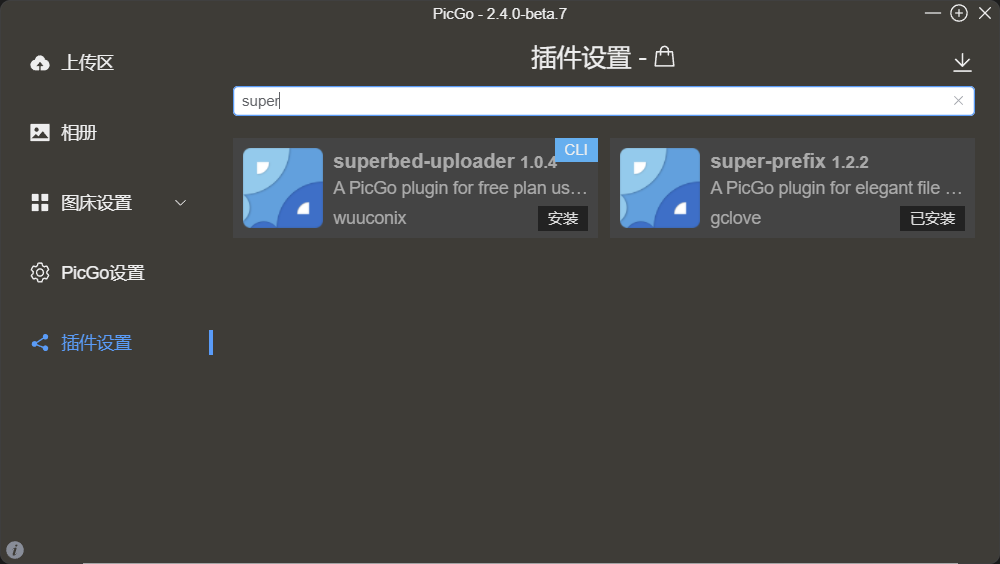
image.png
插件配置
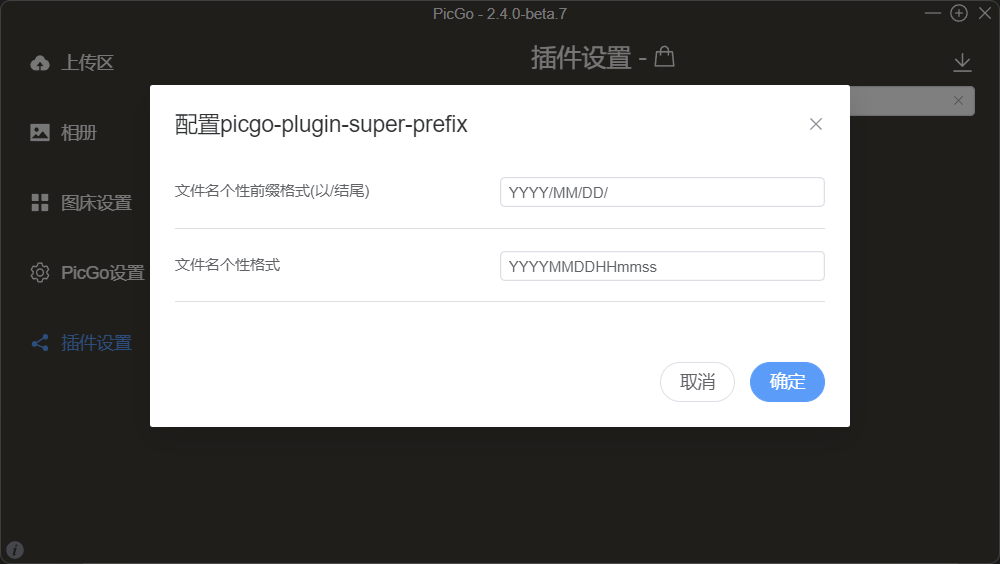
image.png
YYYY/MM/DD/

YYYYMMDDHHmmss
Obsidian 插件安装
首先需要关闭安全模式
- 设置 -> 第三方插件 -> 关闭安全模式
在插件中搜索 picgo 安装即可
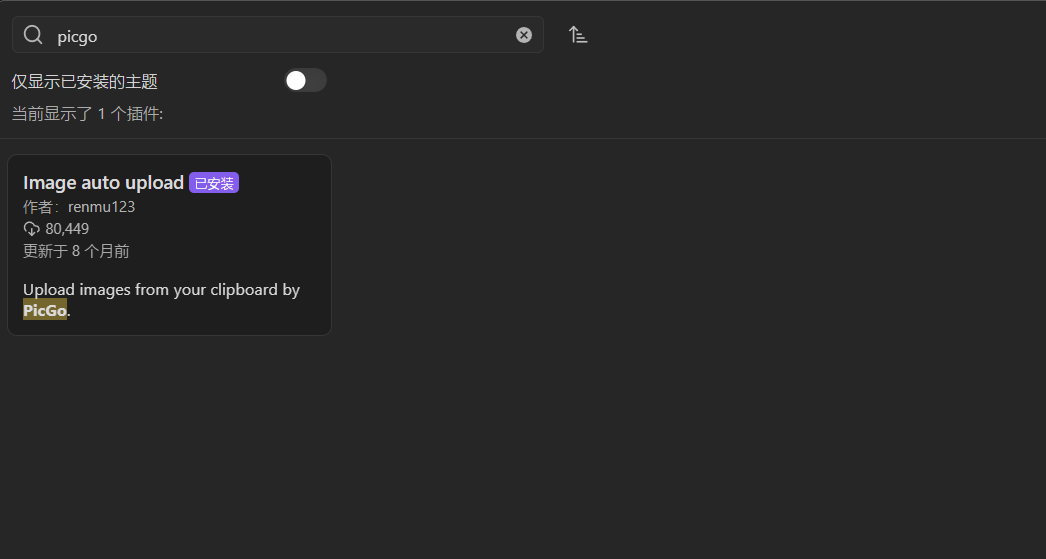
image.png
剩下的这么配置
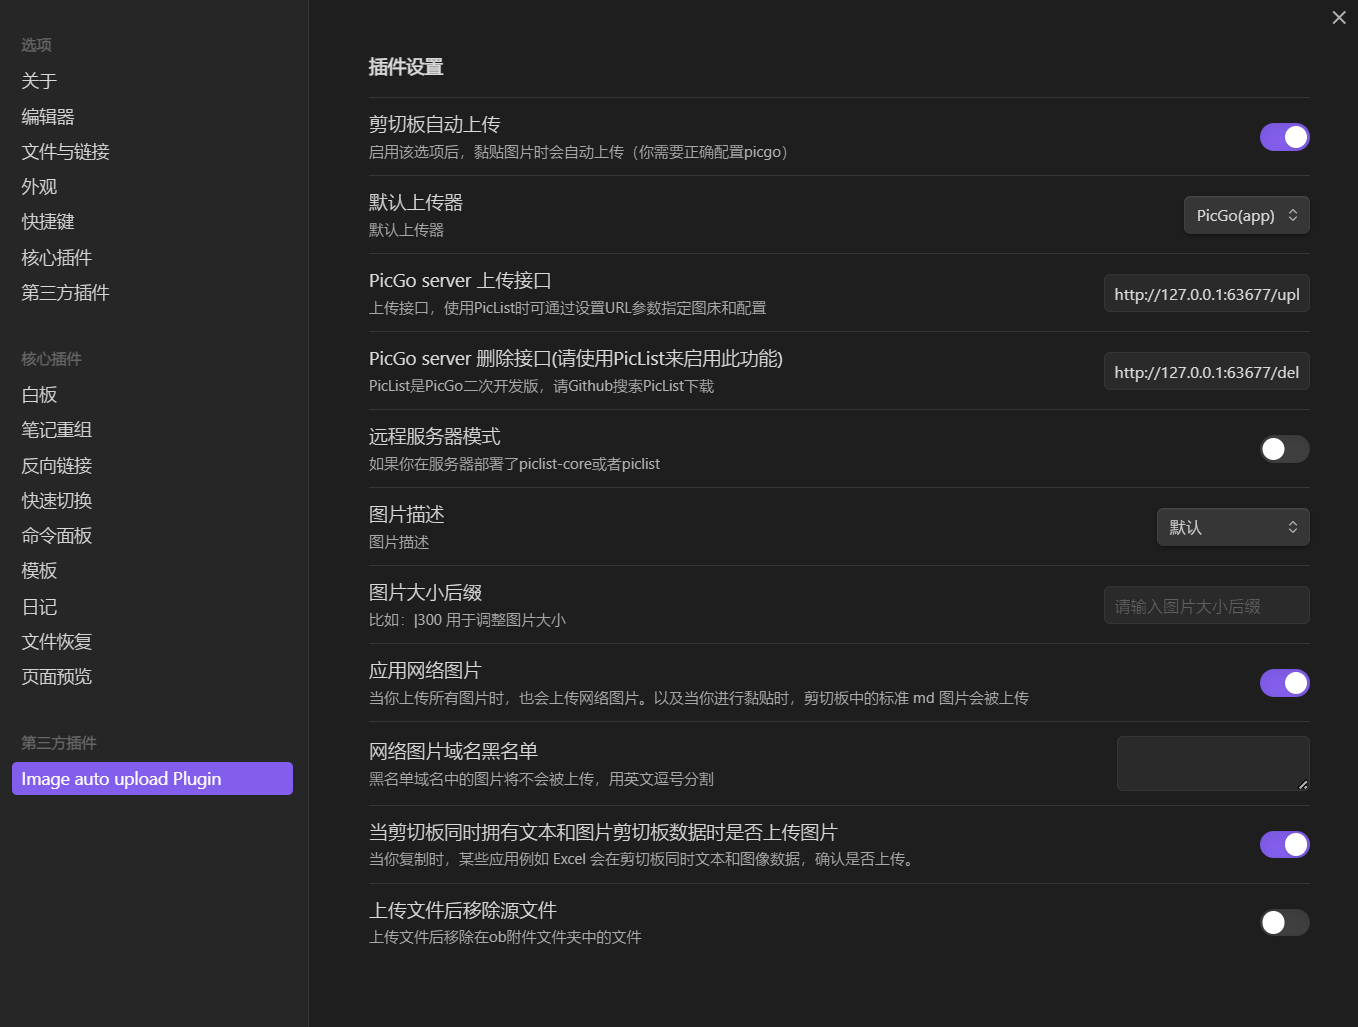
image.png
OneDrive 同步指定的文件夹
在Windows 上登录OneDrive 需要使用管理员权限执行
- win 键 -> 搜索 cmd -> 以管理员权限运行
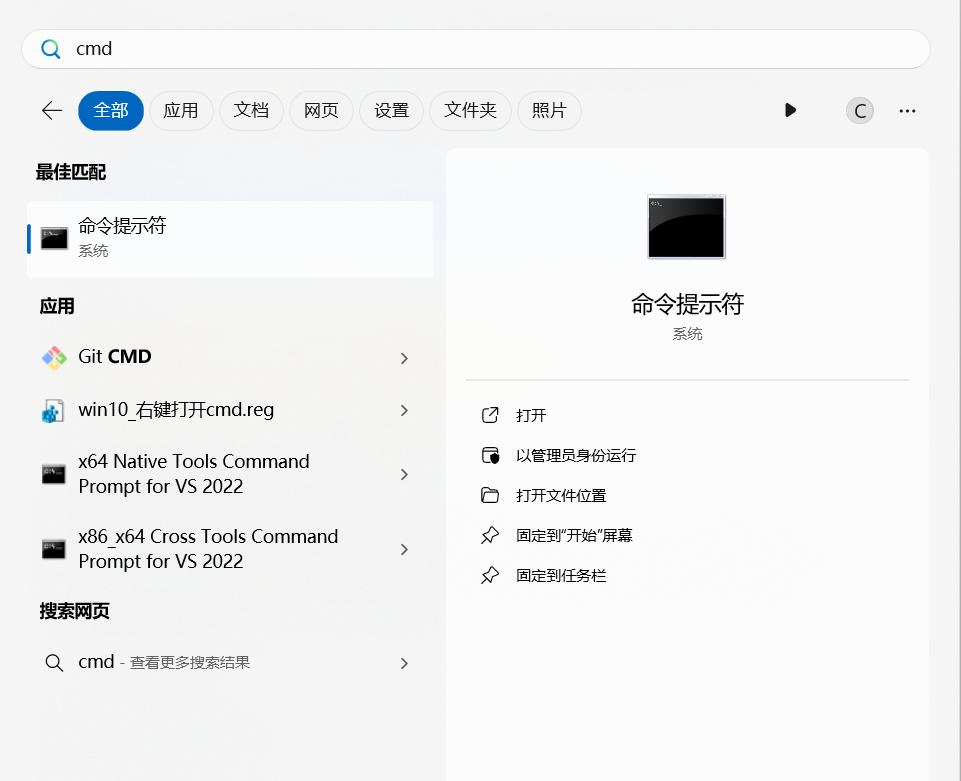
image.png
命令模板
mklink /d "本地OneDrive路径\同步到的文件夹名称" "被同步的文件夹路径"

命令示例
mklink /d "C:\Users\Administrators\OneDrive\Blog" "E:\Blog"
遇到的问题
Obsidian上传问题
Picgo 上传正常但Obsidian上传 Imgur upload failed, check dev console
查看日志发现存在 ENOENT: no such file or directory
访问发现 C:\Users\Administrators\AppData\Roaming\picgo\picgo-clipboard-images 目录不存在
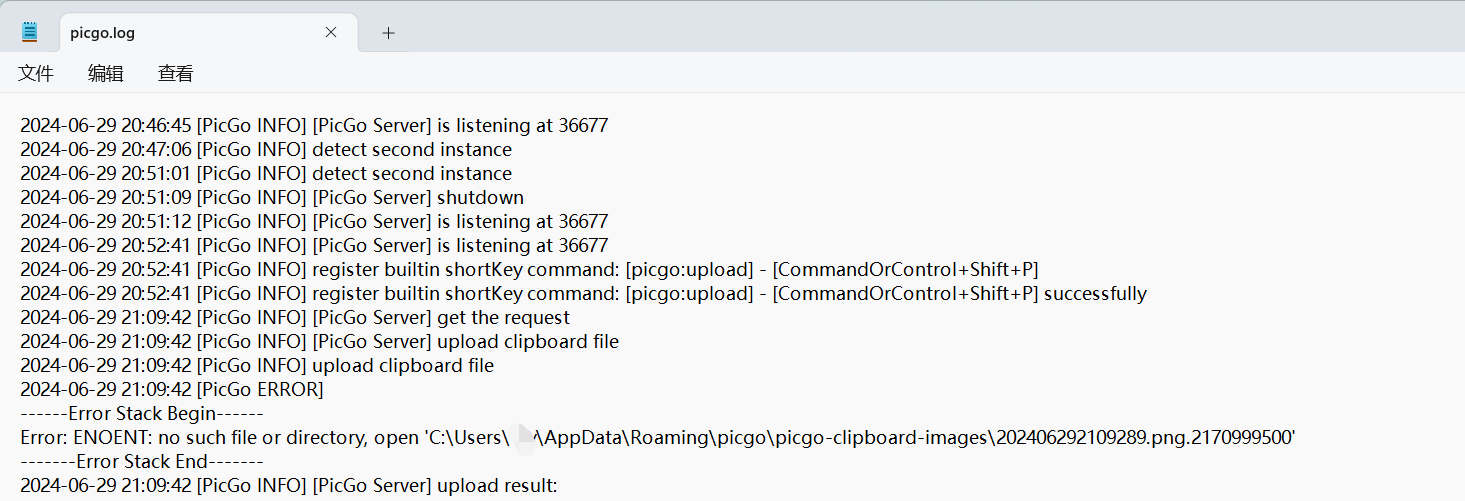
image.png
在 C:\Users\Administrators\AppData\Roaming\picgo 目录下创建 picgo-clipboard-images 文件夹即可解决问题
Administrator 为你自己的用户目录
服务器配置较低导致无法编译
2h2g是无法编译的,我编译使用的是4h8g
在腾讯云的服务器选项创建一个相同的系统版本的服务器-竞价实例,编译完就销毁,花不了多少钱
## 快速编译
## 首先肯定是先上传代码

apt update
cd Shiro
apt install nodejs npm -y && npm install -g pnpm pm2 && pnpm i && pnpm build


zip -r Shiro.zip /root/Shiro

## 上传到生产服务器后需要在执行一下。以安装缺失的模块
pnpm i
然后上传到你的生产服务器上,解压修改.env文件配置ecosystem.config.js进行持久话运行即可
Picgo 无法安装插件
出现如下错误
2024-07-01 22:23:28 [PicGo ERROR] NPM is not installed
2024-07-01 22:23:28 [PicGo ERROR] 插件安装失败,失败码为1,错误日志为
我遇到的原因是软件装在C:\Program Files\PicGo 这个路径需要管理员权限
所以解决方法是退出关闭Picgo软件,然后以管理员权限启动
参考文章
mx-space + Shiro:如纸一般纯净的新博客 - Arthals' ink